Map skills: the way forward!
Our learning has meandered all over the place this week, as we’ve flowed from Leonardo da Vinci, to a plethora of science questions inspired by this genius (such as why we see lightning before we hear thunder), to an abundance of art work, and finally to drawing maps. What started as a fascination by Bean7 in copying parts of an OS map led to an impromtu mini study on maps and navigation in general. And we’ve had so much fun with it! Here are the simple activities we completed to develop their map skills, all of which require minimal preparation.
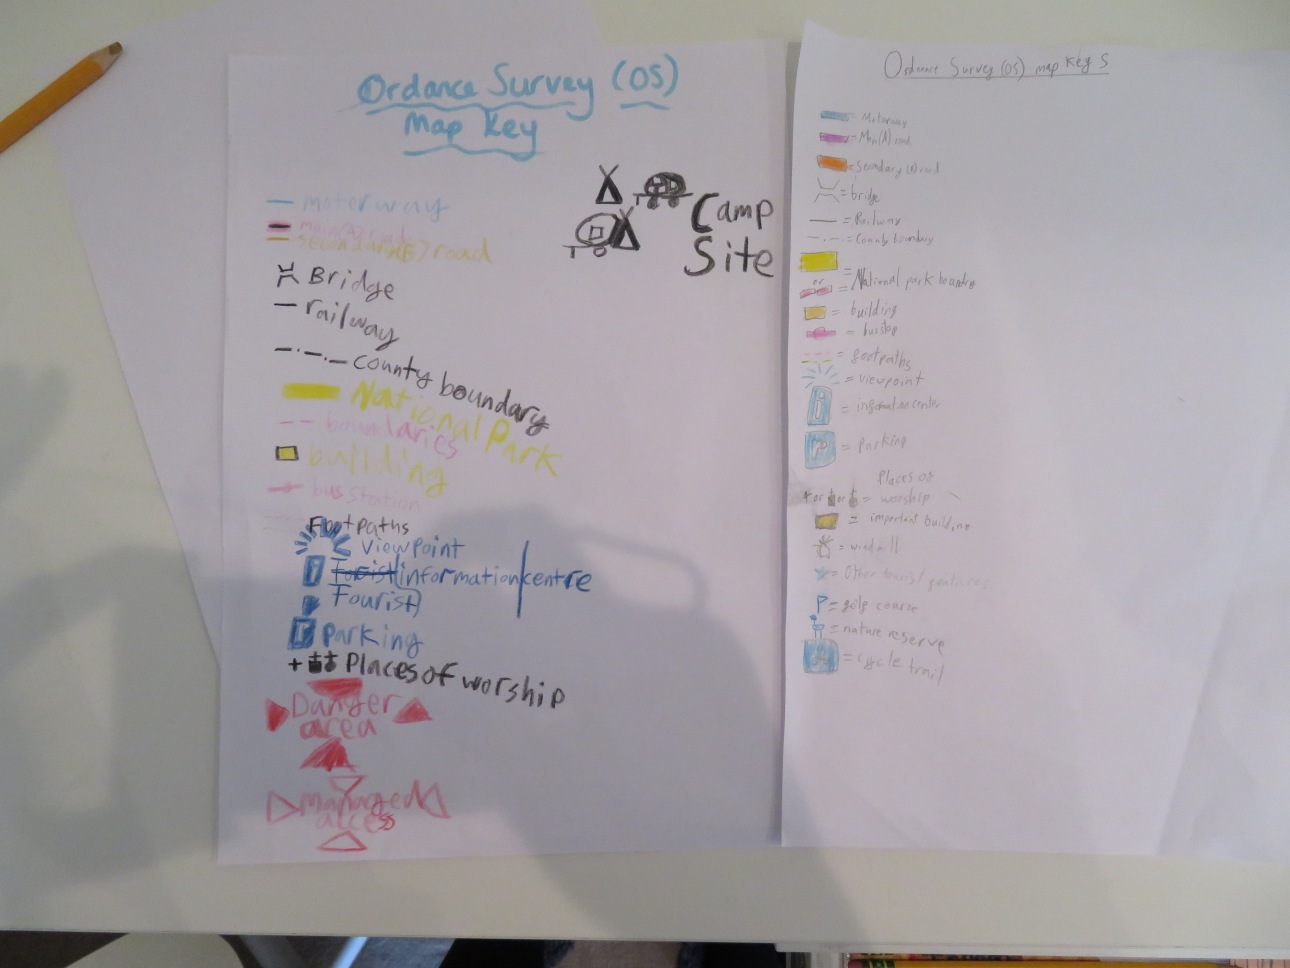
1. Games with the Ordance Survey map
Keys
We pulled out our local OS map and started by reading the key together, identifying the most common symbols and their meaning, and then finding examples on the map. They particularly enjoyed finding our local pub! Bean7 has a current obsession with everything art related, so he was keen to have a go at drawing these common symbols.
I then found some interesting squares on the map for each of them, and asked them to name all the features to be found in that location. Bean7 insisted I pick a square with a danger area!
Grid References
Next on the agenda were grid references. We discussed four and six figure grid references and how to use them. Initially, I set them a challenge of finding the square relating to a four figure grid reference. Then, when they’d got the hang of it, they wanted to set me challenges in return, only this time I had to guess what specific part of the square they were thinking about! This rather neatly provided me a link in to explain how six figure grid references were used to pinpoint specifically where in the square you mean, enabling a greater degree of accuracy. They practised finding specific locations using the six figure references I’d given them, but again were much more enthused about setting me challenges!

Distances & Scales

Next, we looked at the scale on the map and noted the 4cm:1km ratio. We discussed how you can calculate real distances by measuring the distance on the map and converting to km using its scale ratio. As with the other exercises, I initially set them a task to practise this, by working out the distance between two points (using their six figure map references). But again, they insisted on reciprocating and setting me some problems to work out, and in the process reinforced their own understanding. As the old Latin proverb goes: the best way to learn is to teach (Docendo discimus)!

Sketching maps
Finally, in reponse to Bean7’s request for more drawing activities, they each chose a square from the OS map and endeavoured to sketch it in detail using graph paper. They were both eager to produce an accurate depiction of the square, carefully measuring where within the square each of the features should be located.

2. Planning and navigating their own walk using the OS map

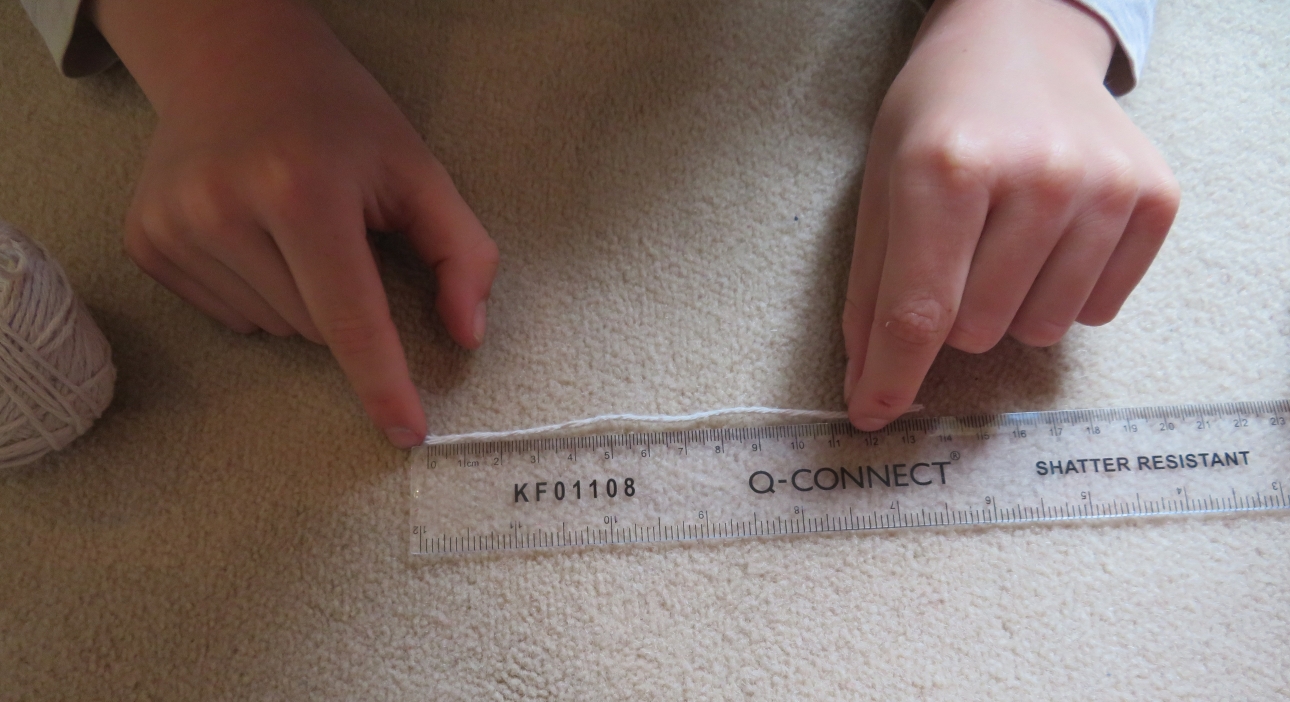
I then set them a challenge of planning their own route for an afternoon walk in the sunshine. Such a simple activity, but so valuable. When working out approximately how long a walk to go on, Bean7 was curious to have an idea of how long a km is, and thus how long it would take him to walk, so we measured 4cm on the map from our house to show him how far 1km was from our front door.
A little time was then spent negotiating (OK, arguing!) about which route to take, but they finally agreed on a circular route around a local village. Using a piece of string, they measured the distance of the proposed route and converted this to km using the map’s ratio. It worked out to about 3.25km, a good distance for an afternoon walk, so off we set, map in hand.
Once I’d parked in the spot they’d requested, they took full charge of navigating us around the planned route. Other than showing them how to use landmarks, footpaths and roads to help them work out how far along the footpath they were, they managed to steer us around the countryside without getting lost! The walk was beautiful although somewhat eventful…

At one point, as we crossed a field in which a herd of sheep grazed by the gate and our exit, Bean7 suddenly dragged me back, shouting, “No, stop mummy! They’re going to attack.” I shrugged him off with a, “Don’t be ridiculous; they’re only sheep!” comment, but as I ushered my two children blithely towards the group, the ram suddenly made a charge at us! Bean7 very sensibly jumped out of the way and managed to get through the gate in double quick time, but Bean8 screamed and ran in the opposite direction. So, now I had one child out of the field standing by the roadside, with me on the other side and a ram in between me and my second child… I was seriously rocking this parenting lark!
Well, I thought to myself, I remember my dad telling me that if you’re ever in the African bush and come face to face with a lion (obviously a regular problem for most of us…), the best thing to do is to make yourself look as physically big as possible and stand your ground. Running off is absolutely the worst thing to do. So, I thought, that’s what I’d try, and with my hands on my hips and legs akimbo, I tried to stand my ground. Unfortunately, the lion image in my mind seemed to initiate an involuntary roar from my mouth. Yes, there I was, a grown adult, roaring at a sheep in a field… The ram took one look at this crazy thing in front of him and promptly charged!
At this point, adrenaline kicked in and I legged it! But, it did at least have the impact of drawing the ram away from Bean8. Fortunately, after a bit of mad running around the field, he stopped chasing me and Bean8 quickly ran over to me for a lift over the fence (there was no way I was going back near that gate and ram again!). Unfortunately, in my haste to throw myself over the fence, I managed to pin myself to said fence as the barbed wire hooked resolutely onto my tights! Awesome! As I stood there, precariously balanced with one leg high in the air trying to pull the barbed wire out of my tights, I got a serious case of the giggles (great timing!). This somewhat hindered my escape attempt.
But I finally managed to extricate myself, and with ripped tights, we wandered back to Bean7, who was waiting patiently on the safe side of the gate, only to be greeted by this sign:

It might have been helpful to have one of these on the other entrance to the field too!
Bean7 has always said that one of his favourite things about me is that I’m good at safety (what an accolade!). I think he may have to reconsider this in future…
After all the excitement had died down, we carried on with our walk. We’ve discussed contour lines before, and how the closer they are on a map, the steeper the side of the hill. The walk provided an excellent opportunity to show them this concept in practice, as we identified how the curves of the 3D landscape were represented on the 2D map, such as this U shaped valley.

Later on, we found some much more adorable and significantly less aggressive examples of the ovine population:

3. Understanding contours through art
In order to bring the concept of map contours to life for the children, we completed three fun and simple art ideas.
Firstly, they made these, with each of the colours representing a different contour:

Secondly, we found some interestingly shaped rocks and attempted to draw where we thought the contour lines should go:

Thirdly, I made a batch of playdough (it’s been a long time since I’ve made any of this!), moulded it into the shape of a hill with one steep side and one shallow side, and wrapped pieces of wool around the hill to show where the contours would go. We even added a blue trigonometrical point to the highest point of the peak!

Then, after viewing the model from directly above, they drew the contours as they would be on a 2D map. This was a great activity to help with their spatial reasoning and an excellent way of demonstrating the complexities facing cartographers.

4. Orienteering
Orienteering, in which you navigate between control points marked on a special orienteering map, writing down the code you find at each marker post, massively appeals to my challenge loving children. It’s like a puzzle to solve. Add in a group of friends, a chocolate prize on completion and a comment of, “I wonder how fast you can do this in?” and you’ve got yourself a winning combination!

We recently visited Bedgebury National Pinetum and Forest with a group of home ed friends, and, for the princely sum of £2, we bought one of their orienteering maps and set off for some fun in the woods! The children practised their team working as well as their navigation skills, and had lots of fun together (despite the torrential rain!) trying to find the marker posts. It was a lovely way to spend an afternoon.

If you’re interested in orienteering, check out the British Orienteering website, which lists all the orienteering courses available in the country, available for either free download or for a minimal cost. It also lists all the orienteering competitive events along with the non competitive club activity sessions organised by local orienteering groups.
5. Navigating using the Sat Nav
In this country, I rarely involve the children in helping me to navigate to a destination. I automatically plug in the sat nav, pop on an audiobook for the children and set off. However, our journey to Bedgebury is a complicated and long drive, down lots of small roads, and given our recent dabble into the world of maps, it proved to be an excellent opportunity for the kids to have a go at navigating. Bean8 navigated me there and Bean7 back, both relishing the chance to sit in the front and be trusted with such an important task 🙂
6. Delving into books about maps
And last, but not least, no project would be complete in our house without some lovely books to complement the theme. Here’s what we selected and enjoyed together; their favourite was undoubtedly The Scary Places Mapbook.

And for the older child/adult map lover out there, we’d recommend Map Addict by Mike Parker; an excellent summer read.
Happy Navigating!


Such great ideas for teaching little dragons about navigating their way.